Making and Decorating a Cake Train

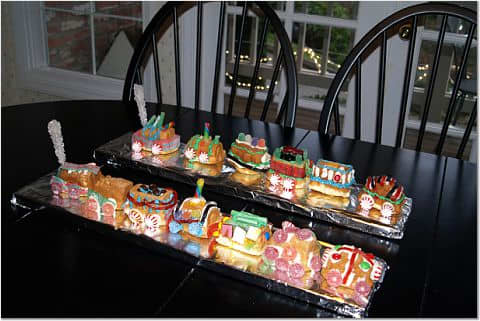
Cousins making a cake train.
Stephanie Hicks
Childhood Memories Making a Cake Train
For the past 5 or 6 years, my children have been enjoying a Christmas tradition started by Grandma. Instead of trying to build a gingerbread house (hard to get the pieces to stay together, and no one wants to eat the house when it's done), my mom has been making a cake train for the kids to decorate with candy!
This annual event always takes place on Christmas eve morning. Grandma makes two whole "trains" using cake mold pans from Williams Sonoma. There are seven train cars, including an engine and caboose. Other segments of the train include passenger cars and a hollowed-out cab for carrying presents/candy, etc. Of the grandchildren, each child gets to pick two train cars to decorate with frosting and candy. When everyone is done, we assemble the cake train on a huge piece of plywood covered with foil. After Christmas dinner, the kids get to eat their creations!
Cake trains can be made and enjoyed at any time of year. In fact, children that love trains may be delighted to have a cake train for their birthday celebration! Kids ages 3 and up can even decorate their own cake train cars at a birthday party, then take them home with them at the end of the celebration. Much more practical and fun than handing out a birthday treat bags.
With a molded pan, making a cake train is relatively easy, but you can also create a cake train from scratch with the directions below!
TIP: Before starting your train cake, prepare a backdrop for its display. As noted above, we used a long piece of plywood (6 feet by 1 inch) and covered it securely with foil. You can even pipe on train tracks on which the train pieces will sit, for added whimsy.

Cake Train ready for decorating!
Stephanie Hicks
Make a Train Cake Using Cake Pan Molds
Admittedly, making a train cake using cake pan molds is the easiest way to create a train cake! The biggest hurdle you will experience is finding a cake pan mold for a train.
Once you have a mold, you can generally use any cake recipe or even packaged cake mix for baking a train cake. That said, you should choose one that is not overly moist because it may crumble when removed from the mold or when you try to decorate it. A pound cake mix or recipe works best for a molded cake because it is drier and firmer.
Regardless of whether you choose to use your own recipe or a mix, You will need to ensure that you have made enough cake batter for the entire train. With the train molds my mother uses, you only need a single cake mix or the equivalent recipe for a 2-layer cake or single sheet cake (9x18 inches) for each complete train. Prepare the molds first, using cooking spray and a light dusting of flour to prevent sticking. When filling the molds with dough, be sure to leave about 1/2 to 1/4 inch from the top to allow for expansion when baking.
After the cakes are done baking, allow them to sit for 30 minutes before carefully removing them from the pans. We have found that the best results are achieved when the cakes are prepared the day before decorating and allowed to cool completely, as well as dry out a bit.


Make a Train Cake from Scratch
You don't need a cake pan mold to make a train cake! The whimsical design can also be created from a large sheet cake, carefully cut and trimmed to make individual train car designs. If you don't have a large pan, bake two (or more) 9x13 sheet cakes and use them both!
As with the tips above, the drier and firmer your cake is, the easier it will be to slice and handle while you build a train cake. A pound cake recipe results in a firmer medium with which to work.
Be sure to prepare your cake pan with cooking spray and flour before adding the batter. That way, it will be easier to remove. Allow the cake to cool for about 1 hour, then remove it from the pan. Wait at least 12 hours (preferably 24 hours) before beginning to work with the cake. Leave the baked cake uncovered because you want it to dry out just a bit.
Before you start trimming the cake to create shapes for your cake train, make a pattern for each piece using construction paper or thin cardboard the same size as the sheet cake. Using a pencil, sketch each part of the train, then cut out the pieces and arrange them on the cake, trying to avoid leaving too many scraps of cake. Using a serrated knife, carefully trim around each pattern piece.
Now you can build your train cake! Of course, simpler designs make this process easier. Frost each individual piece with a thin layer of stiff frosting. If using store-bought frosting, avoid "creamy" selections and consider stirring in 2–3 tablespoons of powdered sugar before spreading it on the cake to make the frosting more sticky.


Suggested Candy Decorations for Cake Trains
- Peppermint or spearmint disks (for wheels)
- Lifesavers (another option for wheels)
- Cinnamon red hots
- Gumdrops
- Thin strands of red or black licorice
- Gummi bears or other gummi animals—create a zoo car!
- Black licorice pieces—for coal
- Jelly beans—miniature ones work best
- Mini marshmallows
- Chocolate chips
- Peppermint sticks
- Gum balls
- Pretzel sticks
Decorating a Cake Train
Whether you have used cake molds or created a train cake from scratch, decorating it is the best part!
Once you are ready to build the train, consider using a good, firm frosting to which other decorations can adhere. I do not suggest using canned frosting because it is too soft. If you do so, stir in 2–3 tablespoons of powdered sugar before applying it to the train cars. You also may wish to make different colors of frosting, adding 2–3 drops of food color.
For cakes made with a mold, you will lose some of the whimsical details if you frost each car entirely. We have found that it's best to pipe the frosting onto each car with a cake decorating tip and pastry bag. With cakes made from scratch, covering each car completely with frosting creates a "canvas" on which you can add details with thin strands of licorice, gumdrops, round hard candies, etc.
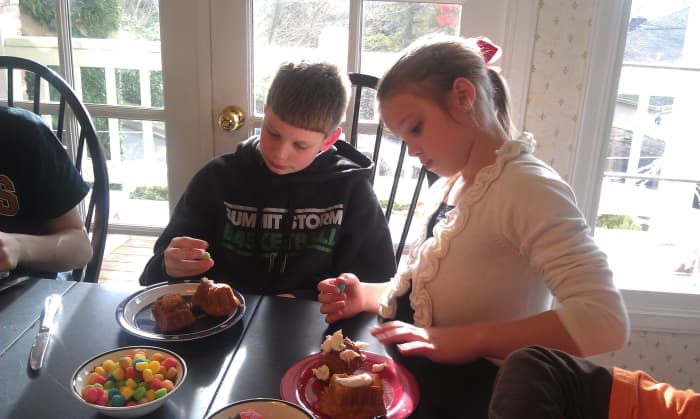
When you are working with children under age 6, they will need adult assistance with the frosting. After the cakes are frosted or have had frosting applied to them, it's time to add candy details. Not surprisingly, children love to help with this part. Put out a number of candies and other decoration suggestions (see right) and let them get as creative as they wish!
TIP: Be sure to select cake decorations that do not pose a choking hazard to children under 3!
Finally, an adult should help arrange the individual train cars onto the prepared cake display (see TIP above). Then, be sure to take lots of photos to add to your family's memory book.

Children love decorating cake trains!
Stephanie Hicks
© 2011 Stephanie Marshall
Trending Now